Tuesday, 27 February 2018

Printer Troubleshooting


DATE   15/02/2018
BLOG PREVIOUS MARK 
GRPWORK+PRESENT+TPS+MINDMAP
        3                   8         1           1
TOTAL: 10/15

PRACTICAL: 27/02/2018
Blog  +  Simulation
  8.5               -


Junk Character Printer Issue

The printer dose not have anything to do with the problem.
It just prints what its told to.
Since it receives a print job in a language it doesn't understand, it spits out garbage.
The problem is somewhere else.

Switching Issue

If you are using an Interface-switching device, remove it.
Connect your computer directly to your printer, and then try again.


Port Issue 

Maybe there is a damaged printer port or you are using a parallel port.
You either replace it or use the correct port which you can check from the Device Manager.
Make sure that the printer is not connected to the same port that is also the printer to the port only.


Driver Issue

Check if the correct printer driver is chosen.
Try to reinstall or update the driver.


Cable Issue

Remove the cable from the printer and then reinsert it or maybe there is a loose or damaged cable, replace the cable.

Mack sure that the printer and then the printer cable is not to long .

We recommend that you use a USB cable that is no longer than 2 meters ( 6.5 feet ).


Name of student : Ashish Yadav
Faculty name: Sayali Mam
Roll no: JK-ENR-SW-1759 
Date: 27/02/2018

Saturday, 24 February 2018

FILE SHARING AND TRUOBLESHOOTING

Cannot access shared folders or files.


  • The Computer Browser service is not started or is turned off on one or more computers in the workgroup.

  • If File and print Sharing for Microsoft Networks is not installed or is blocked by windows Firewall.
-   Start the computer Browser Sevice.

1. Right-Click This PC. 


2. Double-click Services and Application.


3. Double-click Services.


4. Right-Click COMPUTER Browser amd select Start.


-   How to add new folders to shared HomeGroup libraries

  1. 1. Use the Windows key + E keyboard shortcut to open File Explorer.
  2. 2. On the left pane, expand your computer's libraries on HomeGroup.
  3. 3. Right-click Documents.
  4. 4. Click Properties.


5. Click Add.


  1. 6. Select the folder you want to share and click Include folder.
  2. 7. Click Apply.
  3. 8. Click OK.

Friday, 23 February 2018

OS TROUBLESHOOTING PART 5

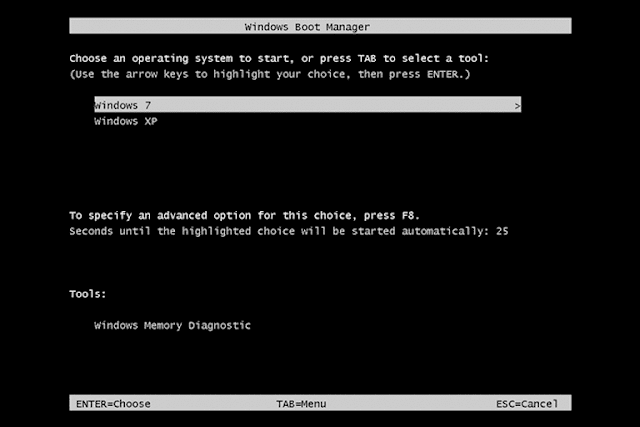
Windows Boot Manager (BOOTMGR)


Windows Boot Manager (BOOTMGR) is a small piece of software, called a boot manager, that's loaded from the Volume boot code, which is part of the Volume boot recod.

BOOTMGR helps your Windows 10, Windows 8, Windows 7, or Windows Vista Operating system start.


Where Is Windows Boot Manager (BOOTMGR) Located?


Configuration data required for BOOTMGR can be found in the Boot Configuration Data (BCD) store, a registry-like database that replaced the boot.ini file used in older versions of Windows like Windows vista.

If you don't have a System Reserved partition, BOOTMGR is probably located on your primary drive, which is usually C.


Windows 8 Startup Repair

Windows 8 comes with some powerful system recovery and repair tools. The process for accessing these tools and running a Startup Repair is similar to XP and Windows 7.
  1. Place your Windows 8 DVD or USB drive into your computer
  2. Restart your computer and the Windows 8 Setup screen should appear.
  3. Click Repair your computer.
  4. On the Troubleshoot menu, select Advanced Options.
  5. Select Automatic Repair from the list of options.
  6. Your PC will run a diagnostic to determine what issues need repair.
  7. Once it finds your issue, it will attempt to repair BOOTMGR.
  8. As with Windows XP and Windows 7, your PC may restart several times during this process. This is normal and nothing to worry about.                                                                          
                                               

Tuesday, 20 February 2018

OS Troubleshooting


DATE   19/02/2018
BLOG PREVIOUS MARK   (ABSENT)
GRPWORK+PRESENT+TPS+MINDMAP
        -                   -              -            -
TOTAL: 00/15

PRACTICAL: 12/01/2018
Blog  +  Simulation
  -                -
                 
TOTAL : --


Repairing the OS


There are several ways to automatically repair major Windows OS problems.


The Startup Repair tool repairs Windows 7 by replacing important OS files that might be damaged or missing. Startup Repair is an easy diagnostic and repair tool to use when Windows 7 fails to start properly.


1.Boot From the Windows 7 DVD


2. Wait for Windows 7 to Load Files


3. Choose Windows 7 Setup Language and Other Settings


4. Click on the Repair Your Computer Link


5. Wait for System Recovery Options to Locate Windows 7 on Your Computer


6. Choose Your Windows 7 Installation


7. Choose the Startup Repair Recovery Tool


8. Wait While Startup Repair Searches for Problems With Windows 7 Files


The Startup Repair tool will now search for problems with files that are important to the proper functioning of Windows 7.


9. Wait While Startup Repair Attempts to Repair Windows 7 Files


10. Click Finish to Restart to Windows 7


Click the Finish button once you see the Restart your computer to complete the repairs window to restart your PC and start Windows 7 normally.


SUMMARY : In this blog you will learn about how to Repairing the OS.


Name of student : Ashish Yadav
Faculty name: Sayali Mam
Roll no: JK-ENR-SW-1759 
Date: 07/02/2018

Sunday, 18 February 2018

1. What is System Recovery?


If you're having problems with your PC, you can try to restore it to the way the system worked on a previous date.
Except for programs and apps that were installed on your PC after the date you are restoring to.


2. Windows Recovery Environment (WinRE)
  • F8 key during the whole booting process. This will take you into the Recovery Mode menu before the operating system begins to load.
  • You can choose the advanced repair options at that point.


  • Click on the Troubleshoot button.

  • Select the Advanced Options.

  • Choose System RestorePicture same as for Windows 8.


3. What is the difference with System Refresh and Reset?

In addition to System Restore, Windows 8 and 8.1 also has the capability to perform either a System Refresh or a System Reset.


Wednesday, 14 February 2018

Benefit of PM and cleaning a PC

Benefits of Preventive Maintenance


DATE   15/02/2018
BLOG PREVIOUS MARK 
GRPWORK+PRESENT+TPS+MINDMAP
        3                   6         1           1
TOTAL: 10/15

PRACTICAL: 12/01/2018
Blog  +  Simulation
  8                -
                 
TOTAL : --
  • Some of the important benefit of a property operated preventive maintenance program included the following.


➡ Increased life of computer and its components.
➡ Fewer sudden hardware crashes and Major repairs.
➡ Decrease in equipment downtime and repair costs.
➡ Increased data protection.


Tool's Required for Preventive Maintenance


  • Some of the main cause of hardware failure include heat and moisture. Overheating is often caused by the accumulation of dust grime on the parts of the computer. 

Tools required for preventive maintenance are as follows.

➡  A mild cleaning solution and lint-free wipes
➡  Canned air
➡  A small brush
➡  Antistatic wirst-grounding strap
➡  A computer vacuum cleaner
➡  Multimeter
➡  Simple hand tools for basic disassembly and reassembly procedures.
➡  Diagnostics software.


Preventive Maintenance Checklist

  • It is always helpful to maintain a checklist periodical check up of computers so that no components is missed out.


➡  Clean the dust and grime from the outside and inside of the computer.
➡  Clean the keyboard, mouse and monitor.
➡  Empty the recycle bin.
➡  Run Chkdsk , scandisk.
➡  Check browser history and cache file.
➡  Clean out temporary internet files.
➡  Confirm that backup are being done.
➡  Check OS and application for update.
➡  Create or update the boot disk.


SUMMARY : In this blog you will learn about how to Preventive Maintenance


Name of student : Ashish Yadav
Faculty name: Sayali Mam
Roll no: JK-ENR-SW-1759 
Date: 15/02/2018

Tuesday, 13 February 2018

Types of Scanner and Installing a Scanner

 Installing Scanner driver

DATE   11/01/2018
BLOG PREVIOUS MARK 
GRPWORK+PRESENT+TPS+MINDMAP
        3                   7          1           1
TOTAL: 10/15

PRACTICAL: 12/01/2018
Blog  +  Simulation
  -                -
                 
TOTAL : --


     A device for examining, reading, or monitoring something, in particular:

Steps to install scanner driver.

1. Download the driver


2. Search driver.


3. Ensure that the drivers for the scanner you want to install are listed.


4. Click the GO.


5. Click the DOWNLOAD.


6. After the file is downloaded open the folder that contains the downloaded file.


7. To begin installation the driver double click the download file .


8. A message box appear asking for permission to allow the the app to make changes to your device . CLICK Ok.


9. the installation begins with the extraction of the required file.


10.  To install the scanner software and driver , CLICK INSTALL SOFTWARE.


11. Click Next.


SUMMARY : In this blog you will learn about how to Installing a Scanner.


                                                  Name of student : Ashish Yadav

Faculty name: Sayali Mam
Roll no: JK-ENR-SW-1759 
Date: 12/02/2018


Robotics?

what is robotics? Robotics is a branch of engineering that involves the conception, design, manufacture, and operation of  robots . This ...